 A Windows 8 App
Important Notice: If you have trouble installing Shredder8 on Windows 8 or 10, try to disable any virus scanner and the windows firewall. It has been reported, that McAffee can cause problems installing Shredder8. Don’t forget to enable again your virus scanner or firewall after successful installation.
Shredder8 allows you to permanently destroy file contents and wipe previously used storage space, so that old data can’t be restored even by advanced recovery tools.
Deleting a file or directory does not remove the contents. Recovery tools (both free and professional) can be used to restore the previous content. Shredder8 allows you to destroy the file contents prior to deleting files and directories.
Shredder8 also allows you to clean the existing free space of a storage device, where old file content may still exist.
You can choose out of a variety of standard cleaning algorithms, like U.S DoD 5220.22-M, British HMG IS5 (Enhanced), Russian GOST P50739-95, German VSITR, or just do a quick shred, which should be enough for most SSD based storage devices and USB flash drives.
Now also available for Android! 
The start screen
The start screen lets you choose the desired task:
– Wipe free space
– Shred files and folders
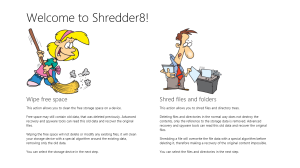
The start screen
Simply click on the cartoon picture to go to the next screen.
Wipe free space
This action allows you to clean the free storage space on a device.
Attention: FAT32 formatted devices can only wipe up to a maximum of 4GB of free space. If you want to wipe more than 4GB of free space, you have to format the device using NTFS.
Free space may still contain old data that was deleted previously. Advanced recovery and spyware tools can read this old data and recover the original files.
Wiping the free space will not delete or modify any existing files. It will clean your storage device with a special algorithm around the existing data, removing only the old data.
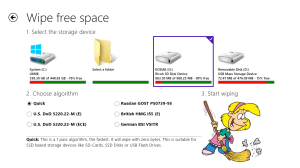
The wipe page
On the top of the page, there is a list of all the removable storage devices that are connected to your computer, plus the system disk and an icon to select a custom folder.
For each item the type and name, along with the information about the free and used space is displayed.
Select the device you want to clean. If you want to reload the list, simply press the back button left of the title and come back again to this screen. The list will be reloaded each time the wipe screen is opened.
If your device is not listed, or you want to wipe a network drive, you can press the “Select a folder” icon. This will open the Windows file picker dialog, which lets you select a folder from your computer or network. The wipe process will create a wipe file in that folder, filling up the free space on that device. If the free space can’t be calculated for a folder, you will see an error message. Such devices can’t be cleaned by Shredder8.
After you selected a device or folder, you can choose the algorithm (method) that will be used for cleaning. A short description of the algorithm is displayed at the bottom of the screen, when you select one. The default is the “Quick” algorithm, which should be suitable for most use cases.
Finally, to start the wipe process, simply click on the cartoon image. After a confirmation dialog, the wipe process will start and display a progress bar. The speed and total time of the wipe process depends on a lot of factors. Depending on your processor, device type and other hardware constraints, the speed may vary. The average speed is displayed in the progress bar in MB/s (Mega Bytes per second). From this, the remaining time is calculated and displayed in hours:minutes:seconds. Of course, algorithms with more passes take longer to complete than algorithms with less passes.
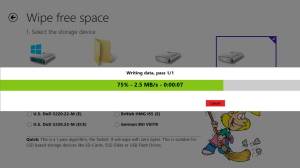
The wipe progress
You can cancel the wipe process at any time, but this may leave parts of the device with your old data. You can re-run the wipe process again later.
A message will be displayed when the wipe process is finished and the wipe file will be deleted automatically.
Great effort has been made to make sure that the App does not crash during the wipe process and leave a wipe file on the device. In case such a crash happens (or if you kill the App manually), you can delete the wipe file by hand, using e.g. the Windows explorer. The file is named “shredder8.wipefile”.
Shred files and folders
This action allows you to shred files and directory trees.
Deleting files and directories in the normal way does not destroy the contents, only the reference to the storage data is removed. Advanced recovery and spyware tools can read this old data and recover the original files.
Shredding a file will overwrite the file data with a special algorithm before deleting it, therefore making a recovery of the original content impossible.
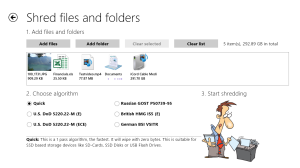
The shred page
On the top of the page, you find some buttons that allow you to add and remove files and folders to the list of items to shred.
Add files: This allows you to add one or more files to the list of items. The Windows file picker will be opened, where you can browse for and select the files. Your selected files will be added to the list.
Add folder: This is similar to the “Add files” command, only that it will open a file picker that allows you to browse for and select a folder. (Windows 8 only allows for picking a single folder, but you can add folder after folder to the list) The shredder will shred all the folder contents, file by file. Sub folders will also be processed. After you selected a folder, the folder will be scanned for files and the total size of all the files contained will be calculated. This process may take some time, but it will run in the background. A progress bar will be displayed below the folder icon, as long as this calculation is running. Once the calculation is finished, the size of the folder and its entire sub folders will be displayed.
Clear selected: This will remove the selected items from the list of items. The removed items will not be touched by the shredder. You can select and de-select one or more items from the list using the normal Windows methods for selecting items.
Clear list: This will remove all items from the list of items. The removed items will not be touched by the shredder.
The list of items will display all the selected items along with the size of the items. A sum of the total size is displayed at the top of the list.
After you selected the files and/or folders, you can choose the algorithm (method) that will be used for cleaning. A short description of the algorithm is displayed at the bottom of the screen, when you select one. The default is the “Quick” algorithm, which should be suitable for most use cases.
Finally, to start the shredding process, simply click on the cartoon image. After a confirmation dialog, the shredding process will start and display a progress bar. The speed and total time of the process depends on a lot of factors. Depending on your processor, device type and other hardware constraints, the speed may vary. The average speed is displayed in the progress bar in MB/s (Mega Bytes per second). From this, the remaining time is calculated and displayed in hours:minutes:seconds. Of course, algorithms with more passes take longer to complete than algorithms with less passes.
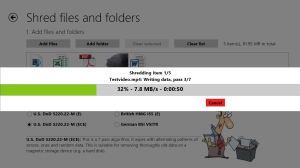
The shredding progress
You can cancel the shredding process at any time, but this may leave parts of the selected files totally or only partly shred. Items that have been shred completely will be removed from the list, so you can easily re-run the shredding process later. Only the files not already shredded will be shredded then.
A message will be displayed when the wipe process is finished and the shredded items will be removed.
If an error occurs during the process, a message describing the problem will be displayed and the process will be stopped at the problematic item.
The algorithms
Quick: This is a 1 pass algorithm, the fastest. It will wipe with zero bytes. This is suitable for SSD based storage devices like SD-Cards, SSD Disks or USB Flash Drives.
Russian GOST P50739-95: This is a 2 pass algorithm, it wipes first with zeroes and then again with ones (Hex 0xff). This is suitable for most magnetic storage devices.
U.S. DoD 5220.22-M (E): This is a 3 pass algorithm, it wipes first with zeroes, then with ones (Hex 0xff) and finally with random data. Suitable for advanced wiping of magnetic storage devices.
British HMG IS5 (E): This is a 3 pass algorithm, similar to DoD 5220.22-M (E), it wipes first with zeroes, then with ones (Hex 0xff) and finally with random data. Suitable for advanced wiping of magnetic storage devices.
U.S. DoD 5220.22-M (ECE): This is a 7 pass algorithm, it wipes with alternating patterns of zeroes, ones and random data. This is suitable for removing thoroughly old data on a magnetic storage device (e.g. a hard disk).
German BSI VSITR: This is a 7 pass algorithm, it wipes first with an alternating pattern of zeroes and ones and finally with random data. This is suitable for removing thoroughly old data on a magnetic storage device (e.g. a hard disk).
For questions and suggestions, please use the contact form. Thank you!

